
Photos by MJ Klein
Originally published on My Several Worlds as a guest article.
Readers of our blog sometimes complain to us privately that when they travel, they are disappointed with their photographs. Then, they usually ask me for some advice on which camera they should buy so they can take better photographs. I tell them that they can take better photographs right now, with what they are currently using.
People mistakenly blame the camera for bad photographs. That’s like going to a piano bar, and blaming the piano for a poor rendition of your favorite song. It’s all about how you use it. I’m going to give you my tips and tricks in 3 areas that will help you take better photographs, now without buying anything else! Let’s get into it right now!
-
Framing
This is a very important aspect of photography and yet it would appear to be the least understood. How you frame the shot determines how it will look to your eye when you view it.
We’ve all seen travel photos from our friends. Typically there will be some beautiful setting, such as a beach. The person will be standing in the middle of the setting, and their face will be dead-center in the photo. Most likely the top half of the photo will be empty sky. Why does this happen?
The photographer is looking at the person with their eyes and then pointing the camera in the same matter. When you look at a person, it’s normal for you to look at their face. In our eyes, their face is dead center. Human eyesight is amazing. It’s the widest wide-screen image there is. Everything else is smaller. When you look through a camera lens, it’s like you are looking through a tiny hole at something. What looks great in that widescreen human vision, often looks horrible thorough the small hole. So, how can you solve that problem?
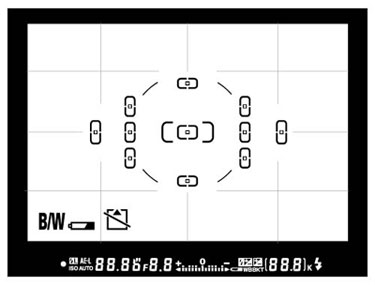
This is a representation of the Nikon D80 viewfinder. The D80 has framing assist lines that can be turned on and off. I suggest that you turn them on and use them as guides to frame shots.
Notice that there are 3 horizontal lines. This divides the frame into 1/4 sections top to bottom. There are vertical lines that do the same thing, side to side. So by lining up objects in the viewfinder with these lines you can position them in the center, left-right, or up-down and know where they are in relation to the outer limits of the photograph. Now, your camera may or may not have these framing assist (sometimes called compose assist) but more than likely your camera has something very similar to help you line shots up properly. Like the D80, your camera may be able to turn these lines on and off, so check your camera’s menu to see if you can find them. Turn them on.
The Rule of Thirds
So, why does the shot with the person’s face in the center of the photograph look so bad? It’s because it violates one of the prime laws of the universe. Well not really, but the face in the center does violate one of the laws of relationships that look appealing to the eye. Photographs look better when things are in the proper relationship to one another. This relationship is what we call “the rule of thirds” and it basically means that the photograph is divided into 1/3 sections. For landscapes this basically means 1/3 sky. Let me demonstrate:
This shot has 1/3 sky and it looks balanced. A less experienced photographer might have placed one of the people in the exact center of the frame, ruining the balance. Yeah, if you measure the photo, it’s a little off. You get the point.
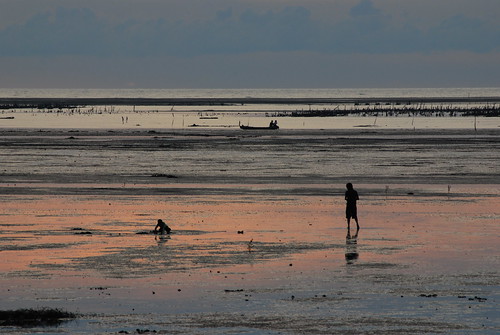
Now let’s examine another photo:

The reason that this photo works is because it’s divided into 1/3 sections. I tried framing this shot many different ways that day, and nothing worked except this one. I invite you to click on this photo and visit my Flickr photostream where you will see more examples, both those that worked, and those that didn’t. See if you can figure out why those that failed, did so.

This photo of us was was taken by a professional wedding photographer. Notice that our faces are not in the center of the photo. Because the background is white, it’s hard to tell but our faces are almost exactly 1/3 from the top edge of the frame.
Get Close
I see far too many photos of people that are just too far away. Use your zoom lens, or get closer to the person you are photographing. Sure, in some cases you want to show the background but make sure you are close enough to the subject so that you can clearly see them. You want the person to be the feature, not just part of the scene. But, some people think that close up shots of people just don’t look good. I want you to understand that if you frame the shot correctly it doesn’t even matter if you cut off the top of their head – the photo will look great just the same.

The eyes are not dead-center and are roughly at the 1/3 position and the shot looks fantastic!
Experiment and you will see a big difference. To make things easy, next time you shoot a person, take a look at how you have it framed, and then try to move the camera so their head gets closer to the top of the frame.
-
Lighting
Another big problem area for photographers is lighting. Naturally when you travel you don’t bring a crew of assistants along and studio lighting gear. But that doesn’t mean you can’t take some great photographs using the available light.
One big mistake that inexperienced photographers make is that they try to photograph their subject in front of a big light source. For example, you may shoot your friend from inside a building while s/he is standing in a doorway. Your camera will be fooled by the large light source behind them and the picture will be dark. Instead, have your friend pose facing the other way, and take the photo from outside.
Harsh overhead sunlight can really make some dark shadows, especially on faces. Your best friend may hate you for taking that one photo that makes her look like she has sunken eye sockets. This is because the direct overhead sunlight made deep shadows on her face but you couldn’t see them with your eyes.
Our eyes have a fantastic dynamic range that effectively cleans up a lot of issues for us automatically. Unfortunately the software in modern cameras is nothing like the human brain. You can take shots with your camera and see things that your eyes don’t see because your brain is correcting for them.
At the very least you should face your subject person towards the sun, if practical/possible, to minimize shadows on the face, and also to reduce the possibility that something behind the subject might be brighter.
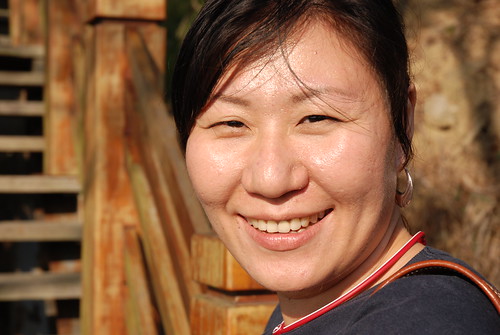
Hui-chen is squinting from the light, but I think it makes a cute photo. Notice that there are no harsh shadows. I’m sure that most women will complain about the light areas that make the skin look oily, but this was a life photo, taken spontaneously and not in a studio. If you really wanted to, you could retouch the photo later to remove those areas. I chose not to.
If the light is directly overhead, you should try to recline the subject somehow. Have them sit in a chair and lean back slightly. This will have the effect of making the light shine more directly on their face.
Sometimes, photos look best when the subject is not looking at the camera but instead is looking into the distance. Try posing your friends just a bit and they’ll think you’re a genius. Look for flattering angles and try different framing, now that you’re not just putting their face in the center.
Sunrise and sunset are magical times. Around the world, serious photographers arrange to be on location at those times because the light is fantastic. Next time you are out with your friends taking photos, and it nears sunset, have them turn to face the setting sun and see what happens. Try shooting buildings and landscapes during sunset and your photography will take on a whole new dimension. Cloudy and overcast days are excellent for avoiding harsh shadows. Those days can be great for people photography because then skin looks softer in the softer light.
-
Crank Up The Colors!
I love cranking up the color saturation levels and getting amazing results! Just take a look:


I love it when the colors scream out at you like these. Look at your camera’s setup menu and see if you can crank up the colors. It will make a big difference!
Remember photography is supposed to be fun, so experiment and see what happens and above all – have fun with it!
A nice article on the basics of composition, however, the advice on lighting is completely wrong!
You should never, ever get people to face directly into the sun. On a bright day this will make them squint and even an overcast day can cause deep shadows under the eye sockets.
Find shelter from the sun; either from a building or under trees for example. You want directional light to avoid shadows under the eyes. If you can’t find shelter, you the photographer should face the sun so your subject’s face is evenly lit. You will need to adjust your exposure to correctly expose the face and be aware of lens flare – unless doing it for artistic reasons.
Looking at the article pictures the first is much better with Hui-chen’s eyes wide open, bright with catch lights. The second picture her eyes are almost closed and her face is covered with speckled highlights that would be very difficult to remove in Photoshop.
Alternatively you can use strong sun light to good effect if the subject wears sun glasses.
Creating lighting patterns on the face, using reflectors, getting catch lights in the eyes etc. are way beyond this article. However thinking about the simple advice above will help you take a competent picture.
Hope this helps,
PatB Photography
thanks for your comments, Pat.
my advice on lighting is not “completely wrong.” you don’t understand the audience that this article is written for. in virtually every case, facing someone towards the light with the light to the back of the photographer is a good practice for amateur photographers. it eliminates the darkening effect caused by the high contrast of backlit subjects. your mention of Photoshop is not even applicable, as anyone who uses Photoshop would be advanced enough to know what to do in a given situation. one thing is clear: if you face the sun and point your camera in that direction, you won’t like the resulting photograph very much.
I don’t think the advice is way off, Pat. It is generally good.
However, there are some drawbacks that don’t take into account facial features of particular people – something inexperienced photographers can’t do anyway, at least not without practice and guidance.
Personal example – I never allow anyone to face me into the sun. Ever. I have light eyes so sun really bothers them and I squint like mad. I have chubby cheeks, so that makes my whole face look like wrinkled fat. I also have very oily skin that I’ve never been able to digitally fix (it’s that oily).
Therefore, that advice doesn’t work for me personally. I prefer lighting from non-overhead sources (side or bottom) and a flash.
That said, however, most people do look better when they are facing the source of light or at least that source is not behind them.
Another thing to keep in mind generally is that a lot of things – like subtly beautiful landscapes – look great to the eye but look dull on camera. The best way to make such a landscape (think seascape, desert, ululating hills) is to have a compelling or interesting object in the foreground. A photo of a few mountains and some farm fields with blue sky is really quite boring; add a farmer in the foreground, to the side, doing something – ta-da! An interesting photo. Take a photo of a beach with a gnarled chunk of driftwood in the foreground and your boring picture of water and sand is suddenly striking.
Also, try taking out most of the color for some photos. Cranking the saturation usually works, but some photos look better with only a hint of color, or even in black and white or a color wash, and with the contrasts cranked up a bit to bring out light and shadow.
Almost all photos look better if you run them through something like GIMP and up the contrast a bit, and either up/down the brightness depending on the photo. It makes the whole thing clearer and cleaner.
Oh yes. Avoid taking outdoor photos at midday unless there is a compelling reason to do so – midday light is terrible.
Avoid digital zoom like the plague.
jennas last blog post..Racist Toothpaste
jenna, thanks for your insights. playing around with the color saturation in the camera is a good way to change the mood and make a photo more interesting, as you pointed out. i also like the rest of your observations. thanks for taking the time to leave them in a comment for us.
Some very good points all around. I like the idea of upping the saturation and plan on trying that soon. Sure there is a lot you can do in photoshop or gimp but I would rather get the pictures I want from the camera and not by manipulating them later.
Talens last blog post..Thai Tourist Attraction Amusement
Talen, i am the same way: i try to get the shot i want in the camera so i don’t have to mess with it later on. in fact, i don’t even own Photoshop, and probably never will. thanks for your comments.
I agree in concept but also don’t have the kind of camera where I can raise or lower saturation as I like, and nothing I do can get the contrasts where I want them in most photos. It’s not a bad camera but it’s not a pro camera. Hence, GIMP.
Also, sometimes I’m not sure when I take the photo if I want it with almost no color, or with color bursting at the seams – and haven’t always got the time to sit there and take multiple photos…especially as I prefer action shots. Again, hence, GIMP.
It has its uses for the lazy amateur photographers among us!
jennas last blog post..Leavin’ on a Jet Plane
hi Jenna. yes, not everyone’s camera has those settings, so one would have to do something else, such as using GIMP as you suggested. since i’m a linux user i’m very familar with GIMP and i also have the Windows version to use on my notebook (running Vistard).
are you on flickr? we’d love to see your photos!
Love the article. I agree with you on “crank up the colors”.
On my Sony DSC-W120…. there is a “Color” setting in the menu. For options I have Normal, Vivid, Sepia, and B&W. For the Vivid setting the camera’s manual says… “Sets the image to bright and deep color”. So I keep this setting on Vivid.
On my Sony DSC-F828… There is a “Color” setting in the menu. For options I have Standard and Real. For Standard it says… “Shoots to make the resullting shot easier on the eyes. The image becomes vivid compared to its real color and the contrast becomes higher.”. This is the default setting. For Real it says… “Shoots for faithfullness to the actual texture and color, which the contrast, brightness, and saturation become lower. This mode is suitable for modifying the image on a computer”. I leave this on Standard.
The DSC-F828 also has menu options for Saturdation, Contrast, and Sharpness. Each setting has +, Normal, and – settings. I leave Contrast and Sharpness on “Normal” and I have Saturation set to “+”.
My latest pics on my Flickr page from the World of Wheels car show came out great with my DSC-W120 camera 🙂
http://www.flickr.com/photos/mike01905/
(a shameless plug)
hi Mike. i took a look at that set on Flickr and the colors are impressive. however you have the camera set is how i would leave it. you’re welcome to leave such shameless plugs here anytime you want 😉
On the face the sun / face away issue, if you shoot with the subject looking into the sun, a little fill flash can be a great help. On a DSLR and some point-and-shoots, you’ll have an option somewhere for flash exposure compensation (check your manual as it varies from camera to camera). Set it to -1 or -2, (depending on the overall light) and it’ll throw a little light under the eyes and tame the shadows.
Personally I’m not a fan of upping the color saturation in-camera. I shoot RAW so it’s not an option for me, but if I were shooting jpeg, I’d leave it set to neutral and up it when necessary on the computer. But YMMV.
cfimagess last blog post..Rainbow Smoke
great point about the fill flash Craig.
as you know i’m a big fan of doing all processing in-camera. i figure that the millions of dollars of development money produces a better solution to do photographic processing than software designed for a PC platform of some kind. we all end up with .jpeg files sooner or later so i prefer the custom chip in the camera (i don’t even own PS). great comments Craig. thanks.
The in-camera processing is still software, the only difference is that it’s written to a chip in the camera instead of being on a computer. My 5D mk ii and 40D both came with a software editor that lets me change these if I want, or create personal styles. Most of the development money goes into the sensor and other hardware, whereas a company like Adobe (Lightroom, Photoshop) or Phase One (Capture One) have bigger budgets for the software side of things.
cfimagess last blog post..Shooting Pandas
One thing that I had to admit that I am guilty of when taking pics is centering someone in the pic. I’ve NEVER followed the “rule of thirds”. Sometime when I’m out and about… I’ll have to try this and see how pics come out.
I’ve never seen “framing assist” or “compose” lines” in any digital camera that I’ve owned… but then again I’ve only owned various Sony cameras. All I’ve evern seen/noticed is like the crosshairs in the middle of the viewfinder or lcd screen. I’ve never seen anything in the manuals for these lines.
Now you say out eyes have “a fantastic dynamic range”… but I would say the dynamic range of my eyes have declined quite a bit over the past few years 🙁 The various laser procedures and drug injections I’ve had in them has made it that things look brighter and hazy… even when its not all that bright or all that hazy.
Mike, virtually everyone is guilty of centering the faces of people they photograph. but now that you know you can give it a try and see how things work out.
how have your eyes been lately?
thanks Mike
Last time I was at Mass Eye and Ear (follow-up appointment with the doctor that treated me for the Uveitis)… vision in my right eye was like 20/30 (6/10 for those outside of the USA) but vision in my left eye was 20/100 (6/33).
I have an appointment at Mass Eye and Ear on the 26th (start of the Chinese New Year). I’m sure the retinal specialist will say something to me again about having surgery (the type where they have to go in my eye…. not laser) to “try” and improve the vision in my left eye (no guarantees that it will improve it).
yikes, that sounds scary Mike. we’re all hoping for the best.
Yeah… the thought of that type of surgery scares the s#*t out of me. I’m not sure what the medical name for the surgery is called… so I can’t really look it up on Google or anything to send you a link.
The Uveitis and the worse of the swollen blood vessels from diabeties were in my left eye. This is why my vision is worse in my left eye now. There is a very thin “membrane” over your retina. OCT pictures (a CAT Scan for an eye) shows wrinkling in this membrane. Not sure if the surgery would be to try and fix the membrane… or to remove it. Either case… NOT something that I would be looking forward to.
Mike, just the description of the problem is scary! i can’t imagine having to go through with that. before you go under the knife, you’d better come here and check things out first. you can meet Yu-fen and the rest of the gang of bloggers and Flickrites. we’re in your corner Mike.